So that we can go shopping, right? I have already started the two for them and one for me cycle that seems to work so well for me this time of year......coldwater creek (40% off and free shipping) for them and crocs (25% off and free shipping over $60) for me.....so love this time of year..
So....I have stuff on sale today. I have 16 items listed that are specially priced. Here is a sample:
Tim Holtz Grunge Blocks originally $11 now $6
Amy Tangerine Paper - 32 sheets originally $25.60 now $12.00
Thickers - selected varieties - now $2
Select Basic Grey Collections packs - originally $21 now $7
The thing is that many of these are the LAST ONE. They are the first listings that you will see on the page and they all have LAST ONE in the item title at www.itsalwaysfabulous.etsy.com
So here's my promise....for every one that sells out, I will list something similar at similar savings. I have them all lined up and ready to go.....I will also be adding an item for every order received today...so you can see that there can be lots and lots of items showing up today at incredible prices.
You will want to check back often.
You will want to fill your cart many times....if you place more than one order today, note for me in the comments section that it is a second or third or fourth order and I will refund the shipping costs down to actual on the combined orders......how easy is that?
Also have the Farmhouse collection from October Afternoon in stock and ready to ship.
Thanks so much for all your business and good wishes at Thanksgiving....hope you all had a great one....now get back to work.....or shopping...whichever is better for you.
Monday, November 28, 2011
Thursday, November 24, 2011
Happy Thanksgiving
I hope that you are all enjoying your day....for some a day of rest....for some a day of frantic kitchen activity....for some a day to be with loved one by phone or in person (by skype for the advanced technicians)
I hope, though, that for all of us we have or make a few minutes to take a look around and see our lives from a cup half full perspective. We all have things that we wish were different, we all have things we want to change....but we also all have things and privileges and rights and beliefs that so many would love to have....they key is to appreciate what we have not worry about the things that are not....
I'm not cooking much today...the bird is scheduled for Saturday.....my daughter is an executive for Target and nobody is asleep at midnight on black friday there....my son is working on his master's and is taking the weekend to get caught up on studies....but I will still have people around today who love me, a pack of dogs wondering where the turkey drippings are, and a stack of boxes ready to ship that show love in a different way.....
I hope for you, this Thanksgiving Day, that you all have a life filled with happiness, health and comfort....I wish you the gift of loved ones, the gift of friends, and the gift of peace. It is what I feel I have and would wish nothing less for you.
Happy Thanksgiving
Tuesday, November 22, 2011
Is It Friday Yet?
Don't you just hate waiting for something? I, personally, am a lot about instant gratification....so the fact that they have been showing me black friday preview ads for weeks now but telling me i can't have the stuff is just crazy making.
So why am I telling you this? I am telling you this because unlike the others, I will not make you wait. I am actually cooking the big meal on Saturday, so I would prefer to have all my orders current as of Friday....
So the black friday sale is all about free......free stuff and, for some, free shipping.
Don't like free stuff? Check back over the weekend for Cyber Monday deals.
Buy any set of Jenni Bowlin foam stamps - Get a complete set of foam alphabet stamps from Pebbles free
Buy any set of 7gypsies printed paper tape or gaffer tape - Get a roll of 7gypsies plain paper tape free
Buy one studio G paper/embellishment kit for $4.00 - Get another paper/embellishment kit free.
Buy any item from the new Tropical Travelogue collection by Graphic45 - Get a 10 sheet set of paper from the Graphic45 Domestic Goddess collection free
Buy any misting product from Tattered Angels, Studio Calico or October Afternoon - Get a 1 ounce bottle of Shimmerz mist free.
Buy a set of October Afternoon Boarding Pass paper - get a matching set of buttons or rubons free.
Buy any 7gypsies 12x12 or 8x8 paper pack and get an 8x8 paper pack free.
Buy any Basic Grey product - get a set of Basic Grey embellishments free
Buy any Sizzix product - get a free pack of 24 sheets of 6x6 patterned paper - cut down from 12x12 - papers are from basic grey, 7gypsies, cosmo cricket, etc
For every three ribbon items you buy - get a free ribbon item
Buy any Tim Holtz product and get 50 #8 manilla shipping tags free
Buy any Kaisercraft dimensional wood ornament and get one free
Buy any three stickles and get one free
Buy any Melissa Frances album or kit and get a set of pearl brads free
And yes, you can get all of these free gifts with the purchases stated....you could really get a lot of free stuff.
All free products are my choice from stock.
And, for a bonus, spend $50 and get free U.S. shipping - half off Canadian shipping.
You MUST MUST MUST put GIVEMEFREESTUFF in the comments section of your order. If you qualify for free/reduced shipping, your shipping charges will be refunded into your Paypal account when the label is printed.
These deals are available now and continue through Sunday Night at Midnight when the Cyber Monday deals are announced.
So what are you waiting for? Shoppppppppppp
Happy Thanksgiving
Friday, November 18, 2011
Fabulous Friday With Kate - Hero Arts/Sizzix Goodness
It's always fabulous here but especially on Fridays when Kate shares some goodness with us. This week she is using one of the sets of Hero Arts Stamps and Framelits on a Christmas project....
Kate Says:
tgifabulousfriday!!!! happy friday everyone!
in this video we are going to be creating the first page of my very first december daily. using a hero arts/sizzix product that includes stamps and framelits is going to make this ohhh so easy. we are going to use some october afternoon & studio calico papers to die cut all of our embellishments, add a few mini markets alphas, tie it all in with the new tim holtz distress ink, and our first page is done.
below are a few photos of the products used. for step by step instructions please click the link to video below. for products used please head over to www.itsalwaysfabulous.etsy.com


thanks for watching and have a fabulous friday!
Wednesday, November 16, 2011
CARDeo Therapy - Pumpkin Card
Today's card is from my very special cupcake Jessie Mae Ross...It is a fabulous Thanksgiving card. Jessie does the most amazing things with the most unusual set of materials.....I'll have to get her to do my favorite butterfly embellishment for a future posting.
Here is the pic of this week's card:

Here is the pic of this week's card:
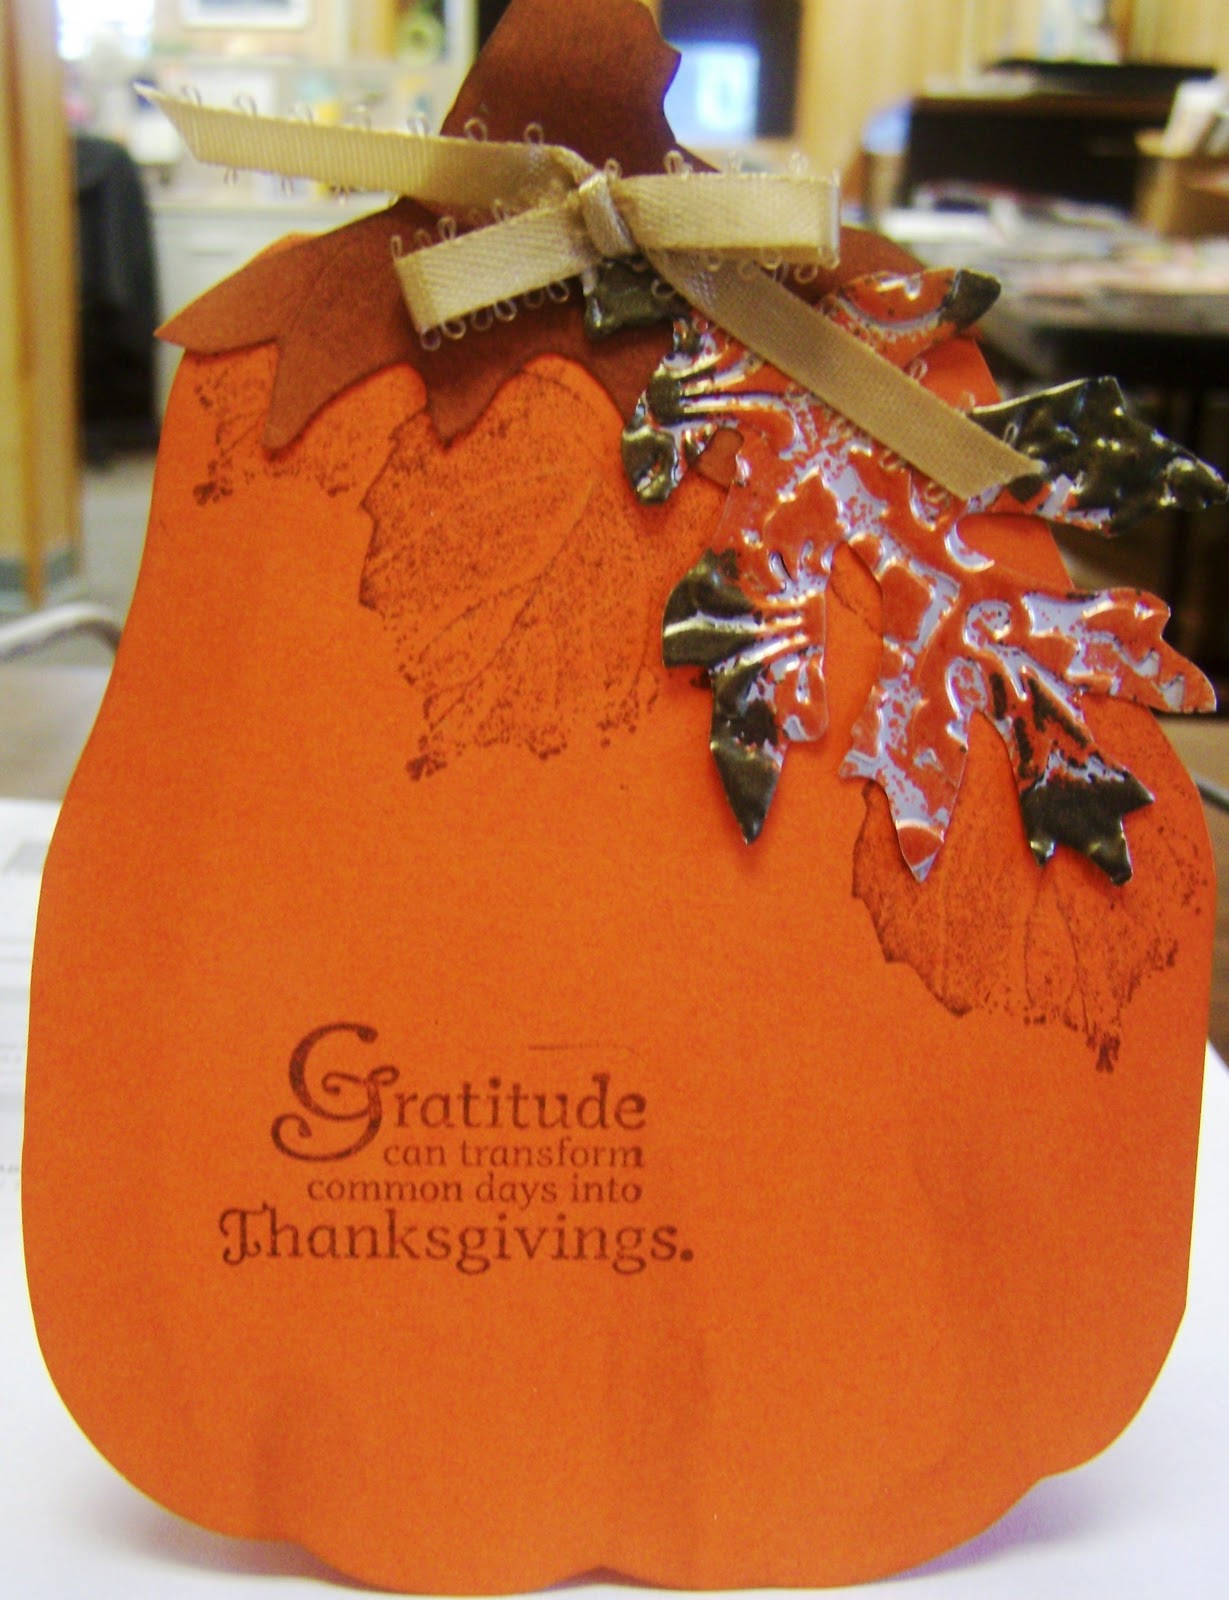
and here are the directions:
Die cut (sizzix-Tim Holtz) pumpkin with your orange cardstock folded and so that the top edge is inside the die, so it makes a card.
You need to cut a just the stem part stem from brown cardstock and cut the bottom as shown.
Chalk the creases of the pumkin
Stamp the top with leaves in brown, (I used the one from SU-French Foliage)
Add the Thanksgiving saying (I used SU-Day of Gratitude).
Die cut (sizzix-Tim Holtz, tattered leaves) a leaf from a pop can or flashing metal
Dry emboss the leaf in a folder so it has texture
Scuff the leaf with versamark, and emboss with orange powder then dark green.
Attach at the top of the card with glue dot and add a fork bow.
Simple and yet so cute....I think these would also make excellent place cards for your holiday table....don't you?
Thanks to Jessie for the card.....I think I am gonna love Wednesday's from now on....
Saturday, November 12, 2011
Jessica Danger - Working with Vintaj and Sizzix - Part Two
Today is a great day to settle back and watch the second part of Jessica's tutorial on working with Vintaj Brass and Etch/Emboss dies from Sizzix.
Jessica says: Today we are going to see how to paint, ink and design your freshly embossed Vintaj Naturally aged brass blanks! In this video we are using Jenni Bowlin Paint Daubers and Tim Holtz Alcohol Inks.
http://www.youtube.com/user/JDangerDesigns#p/a/u/2/fWCZaPVorMI
You are going to love this video...so many good things to know.
New Cover A Card stamps from Impression Obsession listing today. Take a peek....you won't be disappointed.
Friday, November 11, 2011
Fabulous Fridays with Kate - Hero Arts Stamp and Texture Embossing Sets
Kate's video today shows some of the great possibilities from this new Hero Arts/Sizzix collaboration.
Don't just stamp your paper.....don't just emboss your paper, but use this combination set to emboss your stamped image.
The sets are versatile and work with your Cuttlebug, Spellbinder's Wizard or, of course, your Sizzix Big Shot compatible products.
Kate's video suggests the use of chalk in for this type of work and, in addition, my experience is that this product/technique works well with white or color core paper.
The product comes in several patterns including Christmas, holidays, botanicals, and florals...all, of course, available at www.itsalwaysfabulous.etsy.com
Take a peek at this weeks video from Kate....you won't be disappointed.
http://www.youtube.com/watch?
This card is from the Hero Arts Blog using the Birds N Trees product

You can see how the images are raised right where they are stamped....how cool is that. This card also uses the letterpress feature of these sets....the embossing folder itself is inked (in this case with light blue) to apply the color only to the areas that will not be embossed. First the trees are stamped in green on the white paper...then the background blue is used with the embossing folder letterpress style....this puts the blue background in and embosses the trees...all at the same time.
Hope you enjoy this Fabulous Friday with Kate ....the second installment from Guest Designer Jessica Danger will be posted tomorrow.
Wednesday, November 9, 2011
CARDeo Therapy - New Wednesday Feature
Greetings and Salutations......isn't that what cards are all about! Sending a message...
So I have these Scrapbook Retreats every couple of months and, through them, have met the most fabulously creative group of women. I, myself, am not a good card maker. I don't do well on the format. That doesn't mean, however, that I don't know a good one when I see one. So I asked the girls to share and they agreed....Every Wednesday the blog will show a card or cards made by this talented group..along with directions to recreate the card....how fun is that?
Our first artist is Ricki. She amazes me with her decisive creativity. Here's how she introduces herself:
Here's her card


Here's what she has to say about this card
So I have these Scrapbook Retreats every couple of months and, through them, have met the most fabulously creative group of women. I, myself, am not a good card maker. I don't do well on the format. That doesn't mean, however, that I don't know a good one when I see one. So I asked the girls to share and they agreed....Every Wednesday the blog will show a card or cards made by this talented group..along with directions to recreate the card....how fun is that?
Our first artist is Ricki. She amazes me with her decisive creativity. Here's how she introduces herself:
I had been a scrap booker for several years, on and off. A good friend invited me to a scrapbook weekend last fall, it was hosted by Sue (now a fabulous new friend) and held at Loredo Taft in Oregon, IL. On my second day there, a wonderful lady named Pam shared her cards and they changed my life. I have to admit I have not scrapped since, although my pictures are piling up! I simply love, love, love to make cards. It is my “stress-buster”. I have two young children and this is something we can do together, I even give my 5 year old scraps to cut and paste to a pre-made card and he gives them to his teachers. My eight year old has designed and sold cards on her own, I am teaching her about making money while doing what you love to do!
What draws me to card making… I enjoy the ability to pull together colors and textures. I am big on simple layering and inking the edges. My motto is “always ink the edges”, it just seems to “finish” the card and can also help “hide” minor imperfections! I love to look at magazines, blogs, and websites for new ideas. Many times one item, a special piece of ribbon, a patterned paper on sale, a stamp, will inspire the creative process.
Fun tools…I use make up sponges to add layers of color to paper and edges, they are inexpensive and easy to use. I just rub or tap them on the ink pad to get the amount of color I want, I can also pick up a few colors and mix them. Another item from the make up aisle is eyeshadow brushes, I use them with my chalks mainly for shadowing and adding depth to corners.
You can also see my cards on Facebook, if you are interested you can “like” my page, Clever Cards and Crafts. Ideas for selling your own cards, I sell at a local store in Downers Grove IL on consignment as well as craft fairs. I keep a basket with cards at work and people buy frequently, especially birthday, sympathy, and get well cards.
Here's her card


Here's what she has to say about this card
Right now is my favorite time of year, the beautiful rich colors as the leaves change make me smile! This card uses both leaves and those rich colors. I started with a 5 x 6 ½ in card from white card stock. I stamped the front of the card using a maple leaf stamp I bought years ago from a craft store. I stamped in olive green, burnt orange, brown, and red, overlapping the leaves and the edges of the card. I also applied some olive green and burnt orange ink using a make-up sponge.
Next I cut two blocks of card stock, one in a pumpkin orange (5 ½ x 4 in), the other from a wood grain paper (5 ½ by 3). I adhered the orange, slightly off-center. Then I used two cool ribbons I purchased from Sue, a yellow 2 inch wide web-like ribbon and an orange maple leaf ribbon. The yellow was wrapped around the wood grain paper and adhered to the back, the maple leaf was cut to fit and adhered using small dots just over the top of the yellow ribbon.
I stamped “Happy Thanksgiving” in burnt orange on white card stock and the cut it out free-hand. I inked the edges in burnt orange and adhered to yellow ribbon. I used the make-up sponge to add some olive green to the corners. I added two small orange “jewels” to the two upper corners. The final embellishment was an olive green button with twine threaded through from the bottom and tied in a knot. I simply separated the twine on the ends. It was adhered with a round pop-up.
I'm looking forward to seeing what Ricki does next.....See the link on the sidebar to find her facebook page whoch has more news about her and what she's working on....
Tuesday, November 8, 2011
Guest Designer - Jessica Danger
I am pleased and excited to share the work of a fabulous metal and jewelry artist...Jessica Danger.
Here how Jessica describes her inspiration:
My name is Jessica Danger and I live in South Orange County California (I am NOT a "Real" Housewife). I create jewelry in my "free" time, which is really not free at all. Mostly, its me shushing my kids while trying to assemble a lobster clasp.
All of the designs in my shop are handmade by me and each has their own quirks and eccentricities. I love using found objects to create something new and unique.
Thanks for looking around! If you have any questions or special requests, please let me know.
Find me on Facebook - http://tinyurl.com/6e6ol92
Follow me on Twitter- JDangerDesigns
For the first three posts, Jessica will cover working with Vintaj brass and the etching/embossing products from Sizzix....starting with basics through coloring and altering the metal through completing a necklace with the pieces made. There will be two more posts after that, but the contents are a surprise.
In this first video - learn how to use a Sizzix Big Kick/Big Shot Machine (the Vintaj machine is used for the video) along with Vitaj etch/emboss plates to work with Vintaj metal.

You can see a great collection of Jessica's completed jewelry designs on her etsy site at:
Check back tomorrow for the premier of our new Wednesday feature - CARDio Therapy where we will be showing a different card every week for your pleasure and inspiration.
Monday, November 7, 2011
Making Your Holiday Shopping Experience Worry Free
So because I process a lot of orders, I thought that I would send along a few tips for you to be that trouble free internet customer that everybody loves to ship to. These suggestions will help make you the dream customer whose order flies out the door and into your waiting mailbox.
1. Do some profile tuneup now. Don't wait until the day you place your order to update your basic information..you may forget. If you have moved or changed email addresses...take a few minutes to update basic information like that on the sites that you are most likely to purchase from. This will make sure that you are notified with questions/information from your merchant and will make sure that your package will go to the right address on the first attempt.
2. Pay attention to your Paypal account. Etsy defaults to the address on your paypal account for shipping and many of the smaller companies you might purchase from will ship to you through a paypal mailing service like I do. With this service, your package is automatically insured without any cost to you or to merchants like me. This only applies, however, if your papal address is the same as your mailing address. Take the time to change that information now so there will be no delay while labels are voided and reissued. Some merchants will not ship to you if those addresses do not match. Also, did you know that if you have a really cute Paypal name like ChrisandSue and you put your whole name in the first name spot on Paypal - EVERY SINGLE MERCHANT WHO SHIPS A PAYPAL SHIPMENT TO YOU HAS TO FIX YOUR NAME before your label can be printed because there must be a value in both the first and last name fields on your account for shipping purposes. If that isn't there, your merchant must change it for every shipment......and that may cause a delay in shipment.
3. Save yourself some money and worry...shop custom items early. We all will probably have a few last minute purchases to fill out the piles under the tree, but some things we know we want now. Photos for albums/frames, custom sized items, handmade things.....those are the types of things that should be a priority now. While many merchants have a backstock of partly done handmades waiting for your custom requests, you never know which things will be so popular that backstocks run out and you are left without the perfect gift. Gift cards can be acquired on Christmas Eve....custom coats for Fido are not so easy to find.......and if you request a change or customization to a product in November, you are much more likely to get accommodated than if you ask on Decmeber 15th.
4. Make yourself into the perfect customer.....recognize that many Etsy merchants don't work weekends or evenings, many are working alone, and there is no shipping and receiving department...think of merchants for handmade and small companies more like Santa's elves with families and carpools and......lives. Thank your merchant for great service....recommend your merchants to friends and...most of all....partner with your merchants to ensure that everyone has a great and hassle free holiday season.
If I missed any suggestions you might have, please leave a comment...New Guest Designer Tomorrow and a new blog feature on Wednesday.....lots going on...don't miss a thing....
Sunday, November 6, 2011
December Dailies
So I think I am the last person on the planet to get this on my schedule of things to do....am I? It seems that everyone is getting their books prepped this month so that come December 1st they are ready to scrap and photograph daily for an album. Are you in?
If you are doing one of these projects, email me at sue.stoughton@gmail.com with the Subject DECEMBER DAILY and I will add you to the list. The list will then get invited to a weekly chat on tinychat (instructions and specifics will be mailed to interested people in advance) to keep us all informed, inspired and working. We'll have an email list so we can share progress, ideas and more.
I'm gonna go start my book right now....well maybe later today.....but for sure this week.
Friday, November 4, 2011
Fabulous Friday With Kate - Mister Hueys
hey guys, welcome to another fabulous friday video tutorial. this week will focus on studio calico mister hueys. i adore this product and i comes in a multitude of fabulous colors. one of the newest additions is calico shine. this is a product that will transform any flat, matte, mist into a sparkling, shimmery, mist. it can be applied directly over an already misted project or mixed with distress ink to create a great twinkling h2o doop!


to do this simply take your craft mat or wax paper and directly apply your distress ink pad to mat.

then mist with calico shine.


stir with a paint brush and go to town.
it can be used as a watercolor to color in stamp images, with a sponge to create fabulous backgrounds, or simply added to pattern paper details for a little something extra.


another favorite way to use mister hueys is with the masks created by studio calico. below is a layout using a mask and mist that adds some detail to a 12x12 piece of kraft cardstock.


get the most out of a 12x12 die cut paper by using it as a mask. here i have used a die cut by studio calico and used it as a mask to mist the entire background of this 12x12 layout.

hope you enjoyed this video and dont miss next week!
kate
To see the video and hear all the commentary go to http://www.youtube.com/watch?
Subscribe to:
Posts (Atom)